
Picture
Taking and Image Preparation Hints
Below are a
few
"rules of thumb" that you can use to help take some great pictures to
show off your
favourite models for publication on the web or to send via E-mail.
Note,
I have written another article HERE for
taking reference pictures of original subjects you may wish to
replicate.....
General
Use the best quality digital or film
camera
available to you. Those cheap "Instamatic" style or cellphone cameras
are just not suitable
for taking pictures of models, as they can't get in close enough, or
have enough control over the camera's settings.
An SLR (Single Lens Reflex) camera (such as the Canon Rebel series) is
recommended, if you have one. Digital cameras that are adequate for
this
kind of work usually cost upwards of a few hundred dollars, but
the
quality of digital cameras are going up and prices are coming down
dramatically. I started off using a film camera (Canon Rebel
35mm), then switched to a Nikon Coolpix 990 digital camera and now I
use a Canon Digital SLR for most of my own newer work as shown
on this site. The better quality Digital cameras are now equal to or
superior superior to film and are easier to operate, plus of course
there's no processing or wasted film. You can experiment and see
immediate results.
Best to use natural outdoor lighting or
strategic "studio" lighting rather than the camera's flash-bulb. Flash
pictures usually look awful or amateurish. If you have a very brightly
lit shop using daylight type fluorescent tubes, that can do a nice job
as well, but you do need a bright environment for any good photography.
Use a neutral background. Keep
background
clutter to a minimum. You want to show off the model, not it's
surroundings.
Dioramas which are part of the model display are, of course, an
exception.
Frame the picture well. Try to fill the
scene with the model rather than background. Try to get the model
to fill as much of the frame as possible without any of the model
falling out of frame. Also, for a model with direction, such as an
airplane or car... something that is known to travel, leave a little bit
more room in front of the vehicle than behind it to impart a sense of
room ahead of it's forward motion.
For emailing or web publication, save
the
final digital or scanned picture as a Jpeg image (.jpg file extention)
at least 640 pixels wide, not a bitmap (.bmp file extention).
If the picture is to be manipulated, always do so at the highest
resolution, then scale it down to appropriate size after the
image editing has been completed.
Hint: NEVER work using the original
digital image, work on a copy instead, in case you make a mistake.
Also remember that it takes time to do
a good job when photographing models. Be patient and set up your
surroundings carefully and deliberately. Most casual pictures taken at
a whim don't look very good.
Lighting
Try to keep the model evenly lit
(unless
you're trying for something particularly dramatic) without
using a flashbulb.
Flash photography always looks terrible unless you are taking pictures
for documentation of colour schemes rather than showing off the beauty
of the model. Use lighting that shows off all parts of the model
evenly. When using outdoor
lighting on bright sunny days, use white cards positioned just out of
frame
to bounce light into dark areas. Slightly overcast days (without being
too dark) can produce very good results when taking pictures outdoors,
as the light is automatically well balanced and not too intense.
Here is a typical indoor setup that I
use
to photograph models if I want dramatic lighting. The lights are common
halogen work lights, available at most hardware stores. Keep them well
back from the model at least six feet, to avoid hot spots and also to
avoid melting the model from the lamp's high heat! The background
is usually a bolt of black velvet rolled up onto a bar and unfurled
when
I need it. It's always best to have the background curve down to
become the table which the model is placed on, as this avoids an
unsightly
"hard edge" behind the model.
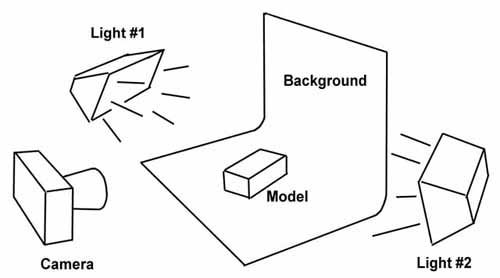
Experiment with various lighting setups
that suit your needs, or just plain "looks cool".
In most cases when I want to make the
model
look realistic as if it were flying in space, light #2 is usually
placed
behind and to one side of the model, and is sometimes the most intense.
The first light is used as "fill" to keep the overall picture from
being
too dark, and is usually a lower wattage light or placed much further
away
from the model. Click here to
see
a photo which shows this particular setup's effect (This model of a 23"
Eagle was actually photographed upside down to eliminate the need for
a mounting rig or hanging the model with wires!).
Sometimes only one light is needed with
no fill necessary. Here is
the
same model shot using only the key light, placed off to the right side.
Click HERE
to see a simple special effects diorama style shot.
If you're not going for anything
particularly
dramatic or realistic, but simply want to show off the model, the
background
can be made from a single large sheet of white paper or better yet, one
of those retractable sheet type vinyl window blinds, which I use
often. Click here to
see such
an example. Never use wrinkled cloth or anything with a pattern on it. Solid colours only. The lighting shown in
the diagram above was not used in the last example, but was instead lit
by the installed fluorescent ceiling light fixtures in my shop above
the
table.
Using
the Camera
|
Digital
Camera
|
Film
Camera
|
For cheaper cameras, use the highest quality setting the
digital camera
will allow. You can compress the image later. With high end cameras
(those
that cost $500 or more) you can use a lower quality setting with good
results.
If possible, try to keep the camera's iris to a high F-stop setting
(small
iris) while flooding the model with as much light as possible. This
will
help to keep the model entirely in focus. You may need to experiment
with
various camera settings. Sometimes you will need to use a time exposure
(slow shutter speed) and in this case, a tripod is mandatory, and a
remote shutter or self-timer is desired so that the camera doesn't
jiggle when taking he shot.
|
Use the highest F-stop setting (small iris) the camera will
allow while
flooding the model with as much light as possible. This will help to
keep
the whole model in focus. Use a tripod to keep the camera
rock-steady while taking the picture. If you have an SLR camera, this
procedure
should be easy. High speed film (400 or higher) is recommended, but you
will still need to use an exposure time that requires the use of a
rigidly
mounrted camera. |
Image
Composition
Keep the model (or
part of the model you wish to show off) in the centre of the frame, and
occupying as much of the entire frame as the camera will allow. Be very
conscious of the position of the model in the frame. A tiny
model in the corner of the frame with a lot of background is not
terribly
interesting! Also, unless you are showing
off a specific part or detail of the model, do not allow any part of
the model to
be "cut off' or left out of the frame.
When choosing a background, make sure
it
is either pure black, pure white white or sometimes you can use grey,
whichever background is in contrast to the model. For example, if the
model is very light, use a black background. If the model is very dark,
you may wish to use a white background. If the model is neutral, use
either one, but don't use grey or the model will blend into the
background too much and will not stand out. Experiment to see
which looks
best, and have a look at the pictures in the "Gallery" section of this web
site if you wish, as a guide. Note the many different ways a model can
be shot. Resist using a coloured background though, unless it's
for a very
specific reason, as a coloured background detracts from the model's own
colour scheme. Remember, it's the model we want people to notice, not
the surroundings.
Image
Preparation
Scanning from
a film print:
Always scan your photographic print at
a resolution higher than you think you'll need. A 4x6 print should be
scanned
at a t least 300 DPI or greater. You will then re-size the
picture in your image editing software. Never re-size a small image to
make it bigger, always take an image that's bigger than you need and
resize it down after the image has been edited.
Scanning the image larger than you need also leaves room for you to
crop
the image, eliminating some of that unwanted background!
Digital Prep
and
Editing:
Take your scanned/digital image and resize
it to an 800 pixel wide image or so (if you will be emailing it or
posting it on the internet) and save it as a medium quality JPG
file. Never send a BMP image through Email, as the file is not
compressed,
resulting in an unnecessarily large file which may clog some email
servers.
Always save the image as a compressed JPG file. Your 800 pixel wide JPG
image should never be much bigger than about 150 Kilobytes (K) or so.
50
- 70K or so is better. If you want to, you can keep the picture larger,
such as 1,200 pixels wide if you really want to show something off or
allow people to have images which they can use as wallpaper or have
printed off. Remember that the bigger the file size, the more internet
bandwidth you'll use.
When editing your pictures, save them in
a "non-lossy" format. Photoshop, for example, uses the PSD format for
continual saves as you work. Then it can be saved as a Jpeg when you are
finished. If you save the image as a Jpeg multiple times, the
compression will degrade the image (lossy) a bit more with each time you
save it.
Although there
are many good quality image editing software programs available, the
use
of Adobe Photoshop as a digital image preparation tool is highly
recommended
to make your images the best they can be for publication on the web. However, if you do not have Photoshop there are also now many online photo editing tools that you can use for free!
One of them, called "Pixlr" (www.pixlr.com) is strikingly similar to Photoshop and has most of the same tools. It's totally free to use online ! Try it out!

Click here to return to the main web
page.
Best viewed with Netscape Navigator 3.0 or
higher,
at a resolution of 800 x 600 or higher.